これまで画像のノイズ除去ができるフィルタとして、
の4つのフィルタを紹介しました。
それぞれの詳細は、上記のリンクから各フィルタの記事に飛べるので、そちらを参照してください。
この記事では、上記の4種類のフィルタの性能比較をし、どのフィルタを使うのがベターなのかを検証してみたいと思います。
画像のノイズ除去ツール(Python)
4種類のフィルタの検証ができるプログラムは以下に紹介します。
動作環境:OpenCV 4.5.5
This file contains bidirectional Unicode text that may be interpreted or compiled differently than what appears below. To review, open the file in an editor that reveals hidden Unicode characters.
Learn more about bidirectional Unicode characters
import cv2
import sys
def main():
print("OpenCV Version: " + str(cv2.__version__) + "\n")
# Loading image data (COLOR)
filename1 = "data/gt_image.png"
filename2 = "data/noisy_image.png"
gt_image = cv2.imread(filename1, cv2.IMREAD_COLOR)
noisy_image = cv2.imread(filename2, cv2.IMREAD_COLOR)
if gt_image is None:
print("Cannot find image1 : " + filename1)
sys.exit()
if noisy_image is None:
print("Cannot find image2 : " + filename2)
sys.exit()
# Average filter (image, window_size)
denoised_image1 = cv2.blur(noisy_image, ksize=(9,9))
# Gaussian filter (image, window_size)
denoised_image2 = cv2.GaussianBlur(noisy_image,(9,9),cv2.BORDER_DEFAULT)
# Median Filter (image, w)
denoised_image3= cv2.medianBlur(noisy_image, 9)
# Bilateral Filter (image, d, sigmaColor, sigmaSpace)
denoised_image4 = bilateralFilter(noisy_image, 11, 100, 10)
# Evaluation with PSNR and SSIM
PSNREval(gt_image, noisy_image, 255)
SSIMEval(gt_image, noisy_image)
PSNREval(gt_image, denoised_image1, 255)
SSIMEval(gt_image, denoised_image1)
PSNREval(gt_image, denoised_image2, 255)
SSIMEval(gt_image, denoised_image2)
PSNREval(gt_image, denoised_image3, 255)
SSIMEval(gt_image, denoised_image3)
PSNREval(gt_image, denoised_image4, 255)
SSIMEval(gt_image, denoised_image4)
cv2.imwrite('noisy_image.png',noisy_image)
cv2.imwrite('denoised_image1(Average).png',denoised_image1)
cv2.imwrite('denoised_image2(Gaussian).png',denoised_image2)
cv2.imwrite('denoised_image3(Median).png',denoised_image3)
cv2.imwrite('denoised_image4(Bilateral).png',denoised_image4)
def bilateralFilter(noisy_image, d, sigma_color, sigma_space):
denoised_image = cv2.bilateralFilter(noisy_image, d, sigma_color, sigma_space)
return denoised_image
def PSNREval(image1, image2, R):
PSNR_opencv, _ = cv2.quality.QualityPSNR_compute(image1, image2)
print("PSNR Evaluation Results")
print(" PSNR (Blue): " + str(round(PSNR_opencv[0],3)))
print(" PSNR (Green): " + str(round(PSNR_opencv[1],3)))
print(" PSNR (Red): " + str(round(PSNR_opencv[2],3)))
print(" PSNR (RGB Average): " + str(round(((PSNR_opencv[0] + PSNR_opencv[1] + PSNR_opencv[2]) / 3),3)) + "\n")
def SSIMEval(image1, image2):
SSIM_opencv, _ = cv2.quality.QualitySSIM_compute(image1, image2)
print("SSIM Evaluation Results")
print(" SSIM (Blue): " + str(round(SSIM_opencv[0],3)))
print(" SSIM (Green): " + str(round(SSIM_opencv[1],3)))
print(" SSIM (Red): " + str(round(SSIM_opencv[2],3)))
print(" SSIM (RGB Average): " + str(round(((SSIM_opencv[0] + SSIM_opencv[1] + SSIM_opencv[2]) / 3),3)) + "\n")
if __name__ == "__main__":
main()
平均値フィルタはコードの以下の箇所が該当します。
This file contains bidirectional Unicode text that may be interpreted or compiled differently than what appears below. To review, open the file in an editor that reveals hidden Unicode characters.
Learn more about bidirectional Unicode characters
# Average filter (image, window_size)
denoised_image1 = cv2.blur(noisy_image, ksize=(9,9))
ガウシアンフィルタはコードの以下の箇所が該当します。
This file contains bidirectional Unicode text that may be interpreted or compiled differently than what appears below. To review, open the file in an editor that reveals hidden Unicode characters.
Learn more about bidirectional Unicode characters
# Gaussian filter (image, window_size)
denoised_image2 = cv2.GaussianBlur(noisy_image,(9,9),cv2.BORDER_DEFAULT)
メディアンフィルタはコードの以下の箇所が該当します。
This file contains bidirectional Unicode text that may be interpreted or compiled differently than what appears below. To review, open the file in an editor that reveals hidden Unicode characters.
Learn more about bidirectional Unicode characters
# Median Filter (image, w)
denoised_image3= cv2.medianBlur(noisy_image, 9)
バイラテラルフィルタはコードの以下の箇所が該当します。
This file contains bidirectional Unicode text that may be interpreted or compiled differently than what appears below. To review, open the file in an editor that reveals hidden Unicode characters.
Learn more about bidirectional Unicode characters
# Bilateral Filter (image, d, sigmaColor, sigmaSpace)
denoised_image4 = bilateralFilter(noisy_image, 11, 100, 10)
比較結果
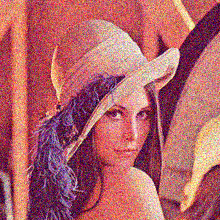
今回テストデータとして以下の画像と用いました。
上が正解画像、下がノイズ画像となります。下のノイズ画像に対して処理を施し、正解画像にどれだけ近づけたかを評価します。


評価方法としてはPSNRとSSIMを採用しました。
定量評価結果
各フィルタに関して、少しずつウィンドウサイズを広げて比較を行いました。
バイラテラルフィルタのみ9×9まで広げても精度劣化が見られなかったため、最終的に11×11まで評価しました。それ以降13×13より大きくしても精度が改善しないことを確認しています。
バイラテラルフィルタのパラメータはsigmaColor=100, sigmaSpace=10としました。
結果を以下の表に示します。

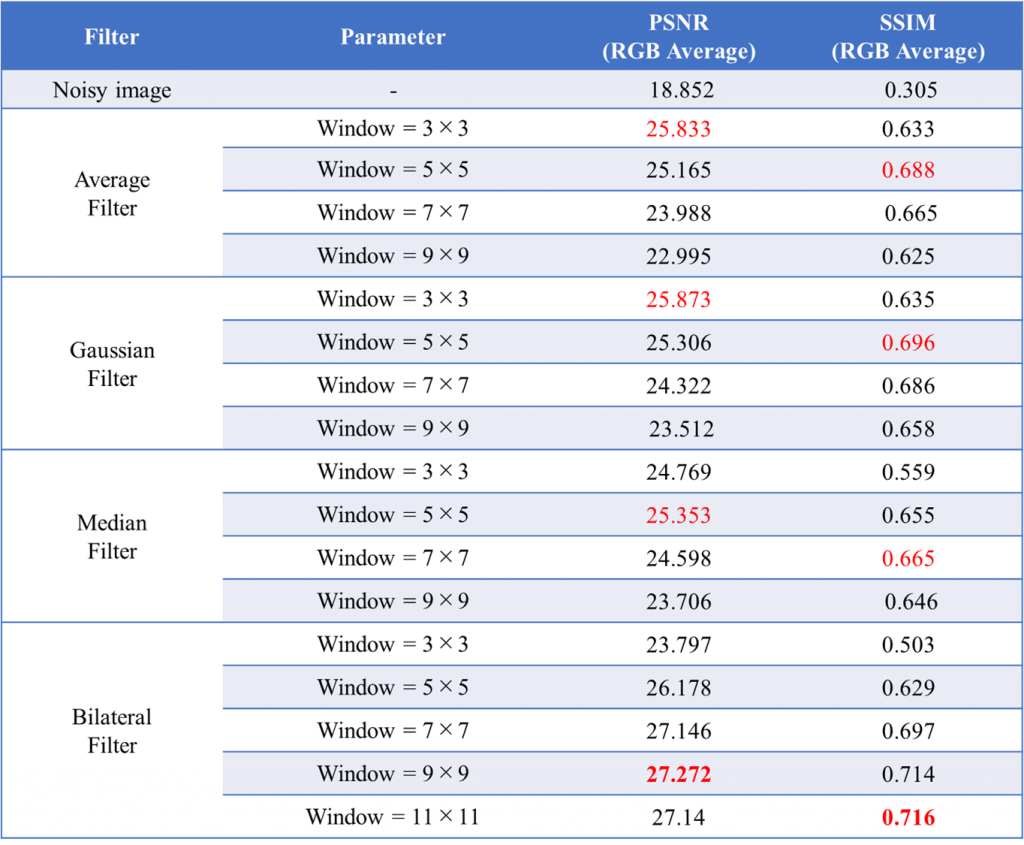
赤字は各フィルタの中での最高値を示します。ウィンドウサイズが大きすぎると精度が低下する傾向にあり、平均値フィルタ、ガウシアンフィルタ、メディアンフィルタは3×3~7×7あたりで最高値を示しました。
一方バイラテラルフィルタはフィルタのサイズを大きめに取った方が良く、9×9や11×11が良い結果を示しました。
また、各フィルタ間の比較においてはバイラテラルフィルタが一番良い結果を示しました。
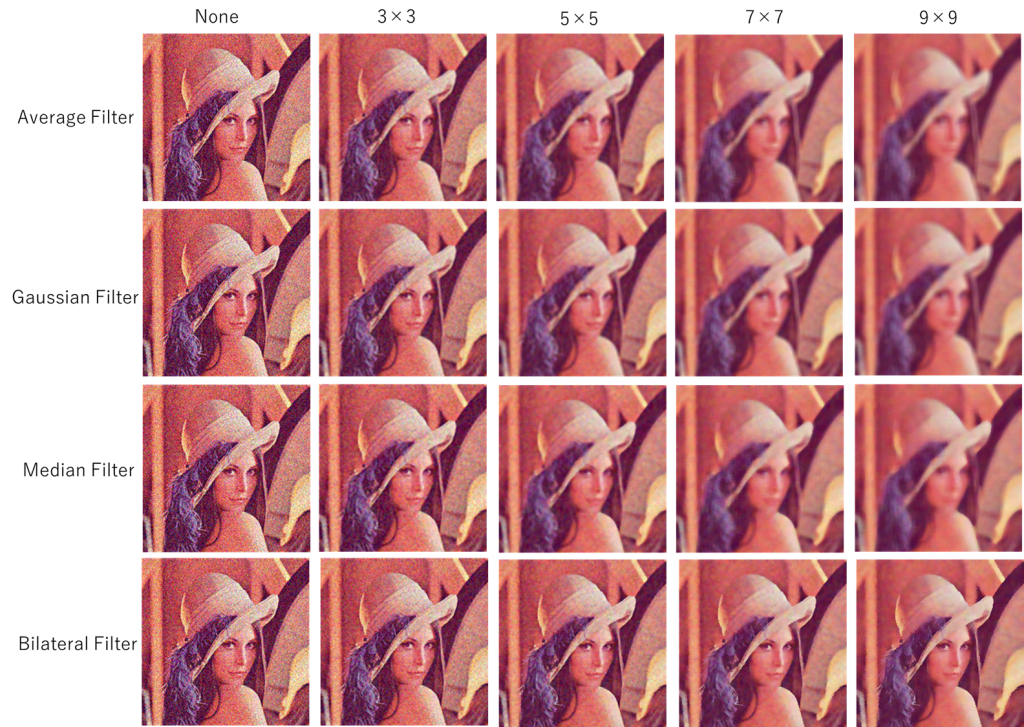
見た目についても確認してみましょう。PSNRやSSIMの結果にも表れているように、9×9のバイラテラルフィルタが一番良い結果のように見えます。

まとめ
4種類のフィルタの比較を行いました。
結論としては、バイラテラルフィルタを使うのが、一番安定して良い結果を得ることができそうです。処理時間の問題等がなく、OpenCVに標準実装されているフィルタで簡易にノイズ除去をしたい場合には、まずはバイラテラルフィルタを試してみるのが良さそうですね。